Guys, nowadays we all have become photographers. Yes, everyone has a high-end smartphone in their hands, and at the same time, good cameras have started coming in all smartphones. Almost every smartphone user clicks photos, but the photos of some people are perfect, and some people’s clicked photos are average. In fact, 90% of people are not able to click perfect photos. It is not that those who are unable to take good photos lack skill; they lack only a little knowledge about how to click photos? And that is why we have come up with this article in which we will tell how you can click good photos.
Smartphone Photography Tips & Tricks
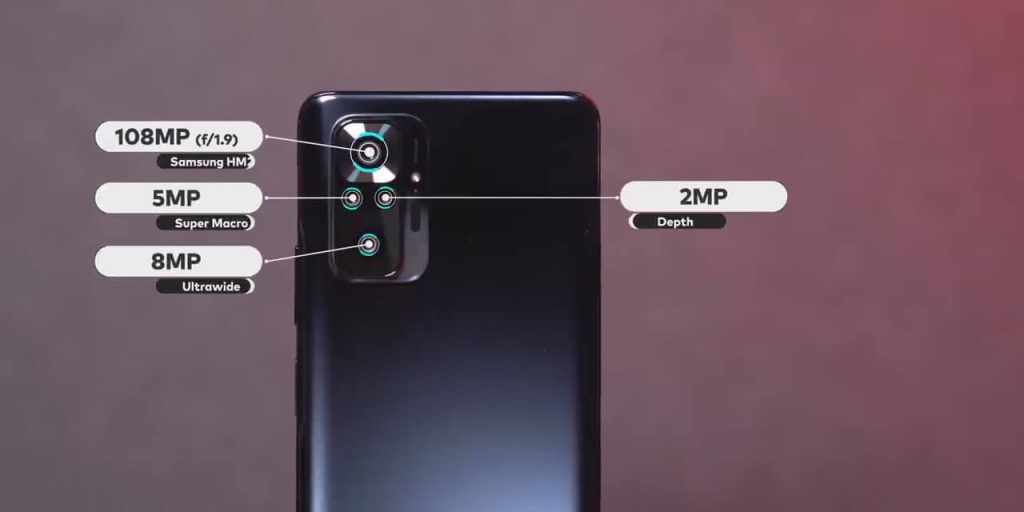
The cameras that today’s smartphones have are capable of clicking excellent pictures; In fact, 108MP, 64MP, 48MP are the primary sensors. You will be able to do a lot with these bigger cameras with more megapixels. Not only that, the camera apps that have come nowadays, whether it is default or third party, many features have come in them which 90% of the people do not use, meaning they do not know how to use them? But those who take good photos know how their camera app is? What are the features? And where to use what feature? And I am going to tell you exactly this thing in today’s article, so read till the end.
3rd Party Camera App
Talking about camera app, let me say one thing, try to use third-party apps, for example, Google Cam. Seriously nowadays, 90% of the phones have the support of Google cam, and because of that, you will be able to click perfect photos. But before that, You have to find the port of Google cam, which supports your phone, then install it, and you will get to see how much difference will be made in your photograph by just changing that one thing. By the way, Below I am giving the link of the ports of Google Cam for different phones so that you don’t need to go elsewhere, as well as giving a link to some good third-party camera apps for you.
Exposure Slider
One thing I have noticed, when you click a photo, then whatever exposure is visible on your screen, you click the same. But there are some simple things by which you can improve your photography; Touch the screen, and you will be able to increase or decrease the exposure, which means you will be able to increase or decrease the brightness. Also, if the shadows are visible more, then brighten it a little and if it is looking too bright, then reduce the slider (Light slider). Because of that, the photo’s perfect exposure should be captured; I mean, perfect color or light on the subject will be seen more accurately, and you can easily do with that slider.
Auto HDR

Auto HDR mode is also included in many camera apps these days. But remember, if there is a moving subject in Auto HDR mode, then blur will come. If there is a stationary subject, then you use Auto HDR, and HDR means what? High dynamic range, which means if there are more dark areas, then they will light them, and if there are more bright areas, they will reduce them so that more accurate details come in your photos. So try to use Auto HDR but only for the stationary subjects.
Use Histogram
Apart from this, you can use Histogram to control exposure or to find out which is the perfect exposure. Now let me say this is a little advanced; if you know, then the Histogram should come in the middle and should not be on the side. If the mountain is what you see in the middle, then that exposure is right.
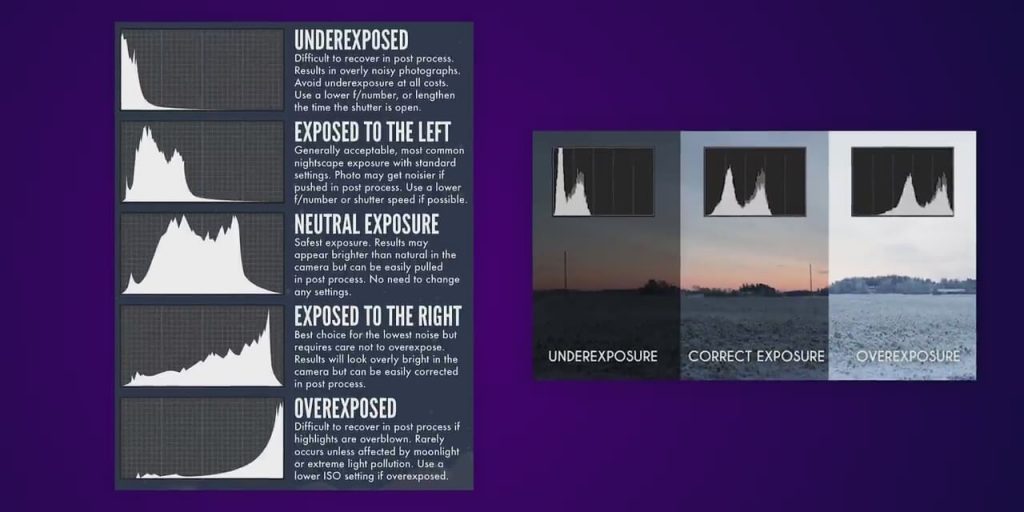
But Histogram also has different things, sometimes you need bright photos, and sometimes you want light-dark. So accordingly, you look near Histogram if you know; otherwise, you will also be able to do post-editing.
Use Raw Mode
Yes, nowadays, the raw mode has started coming in pro mode. Raw mode means what? Whatever details are there in your photos, whether it is of pixels or colors, it stores all that data. Yes, the size of the picture in Raw mode is huge, but if you edit it later in Snapseed, you will definitely get a lot of colors; you will be able to edit that photo in more detail. Sometimes when you start editing, you do a little more or less, the lights of normal photos get burnt, or they start looking completely dark. With Raw mode, you will be able to control them a little more.
Take Burst Photos
Nowadays, Burst Photos are used by very few people who do normal photography. But those who do wildlife photography always use Burst, never take a single photo because they need the exact pose in action photos. By the way, this feature is also there inside the smartphone, you can use it, but normally people do not do Burst Photos, but what do Burst Photos do? They click more than 25-30 photos in a second; then, you will get the exact pose you want for your subject. So try the Burst mode, which is there, you will enjoy but especially on action photos.
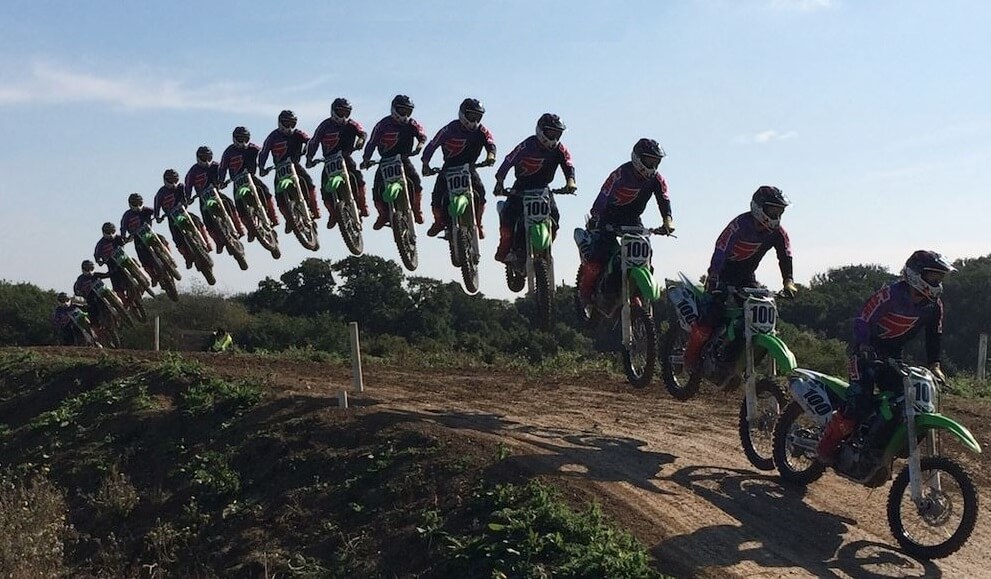
But in Burst Photos, you will get a perfect pose, take that photo, keep that photo, delete the rest, or else the entire storage will be exhausted in a day. By the way, nowadays, high megapixel cameras have come; let me tell you one thing when you use 64MP, 108MP cameras, then the concentration of pixels is in the middle, then there is generally one-third rule in composing when you click the photo. So your subject should be at one-third position. When you click with the high megapixel camera brings the subject a little in the middle because you will get more details there.
Use Tripod
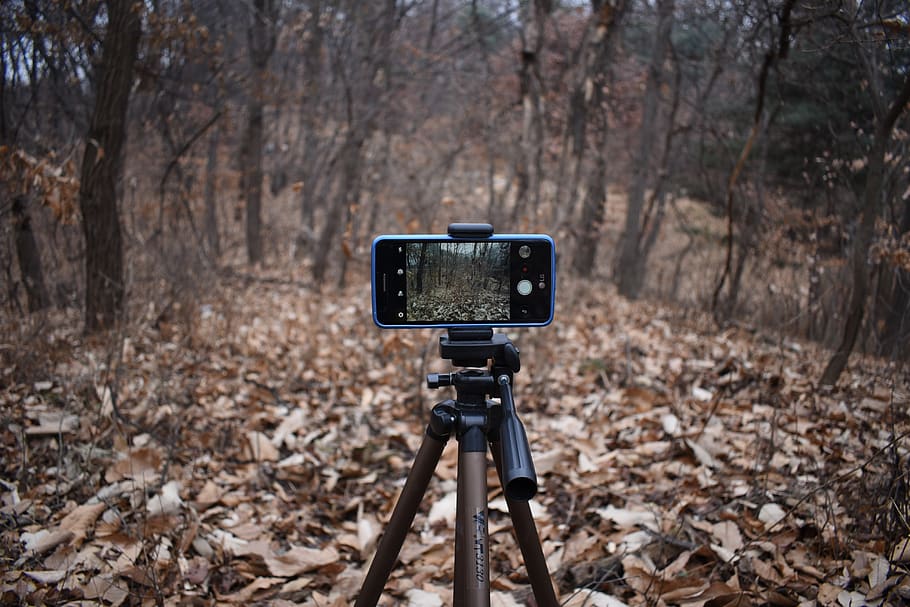
Although these are common things, let me remind you that if you have to take photos in low light, definitely use a tripod. If you do not want blur at all, you want sharp photos; then your phone should be as stable as possible, keep it on the tripod, keep it with any support, and then click photos. Anyway, you will be able to trigger; you do not even need to touch if you have a smartwatch. Moreover, you are able to take photos even with TWS Earphones, etc. So use those third-party things. Don’t touch the phone when taking a photo; even just touching the phone shakes, and its sharpness decreases, so trigger your photo from another device that really helps you and brings out the sharpness.
Conclusion
Friends, many times it happens that we think too much about whether to click photos or not, do not think, keep taking out as many photos as possible. The more you click, the better you will get, and we know practice makes a man perfect; the same is true about camera photography. So keep clicking slowly and don’t be afraid to experiment, take photos from different angles and in different situations, then gradually you will see improvement in your mobile photography. Also, go to comments and if you have taken some good photos that are uploaded on Instagram, Twitter, or any other platform, definitely share its link with us in the comment. Definitely, I would like to see that.
Don’t forget to share Photography Tips & Tricks with your friends and also on social media.